Open a .blend file with multiple materials
Any file will work — the more materials, the more impressive the result.
Automate bulk shader node edits across hundreds of materials — in seconds, not hours.
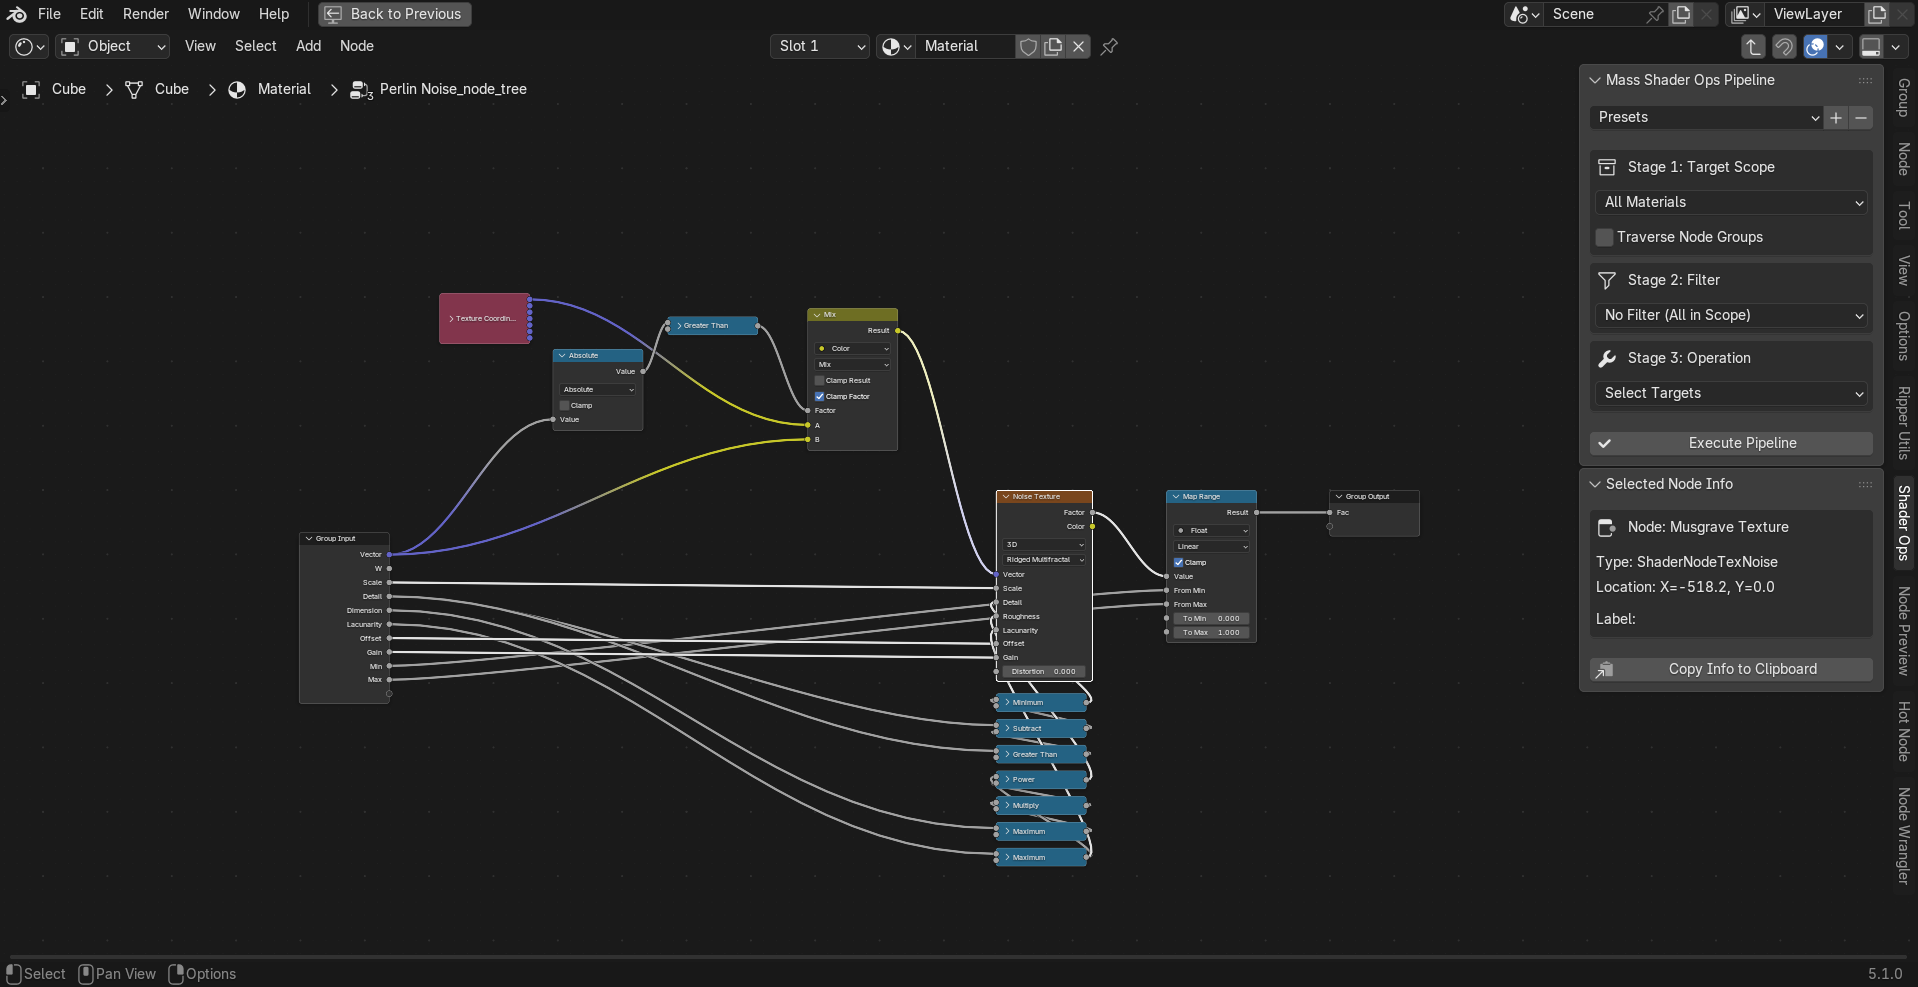
Shader Ops is a Blender addon that lives in the Shader Editor's sidebar (N-panel). It lets you perform bulk edits on shader nodes across many materials at once, using a simple 3-step pipeline:
Instead of editing nodes one material at a time, this addon can affect hundreds of materials in a single click.
Whether you're managing a massive scene or learning Blender shading, this addon saves you time.
Managing large scenes with dozens or hundreds of materials — archviz interiors, game asset libraries, product visualizations. Batch-recolor nodes, standardize naming, connect textures across all materials instantly.
Enforcing shader standards across a project or studio. Audit node trees for orphaned nodes, ensure consistent naming conventions, and bulk-edit material properties to match production specs.
Learning how Blender's node system works by experimenting with batch operations. Clean up messy node trees, organize nodes into frames, and explore how different settings affect materials.
Instead of editing nodes one material at a time, Shader Ops lets you define a scope, apply a filter, and run an operation — affecting hundreds of materials in a single click. Here's what you can do:
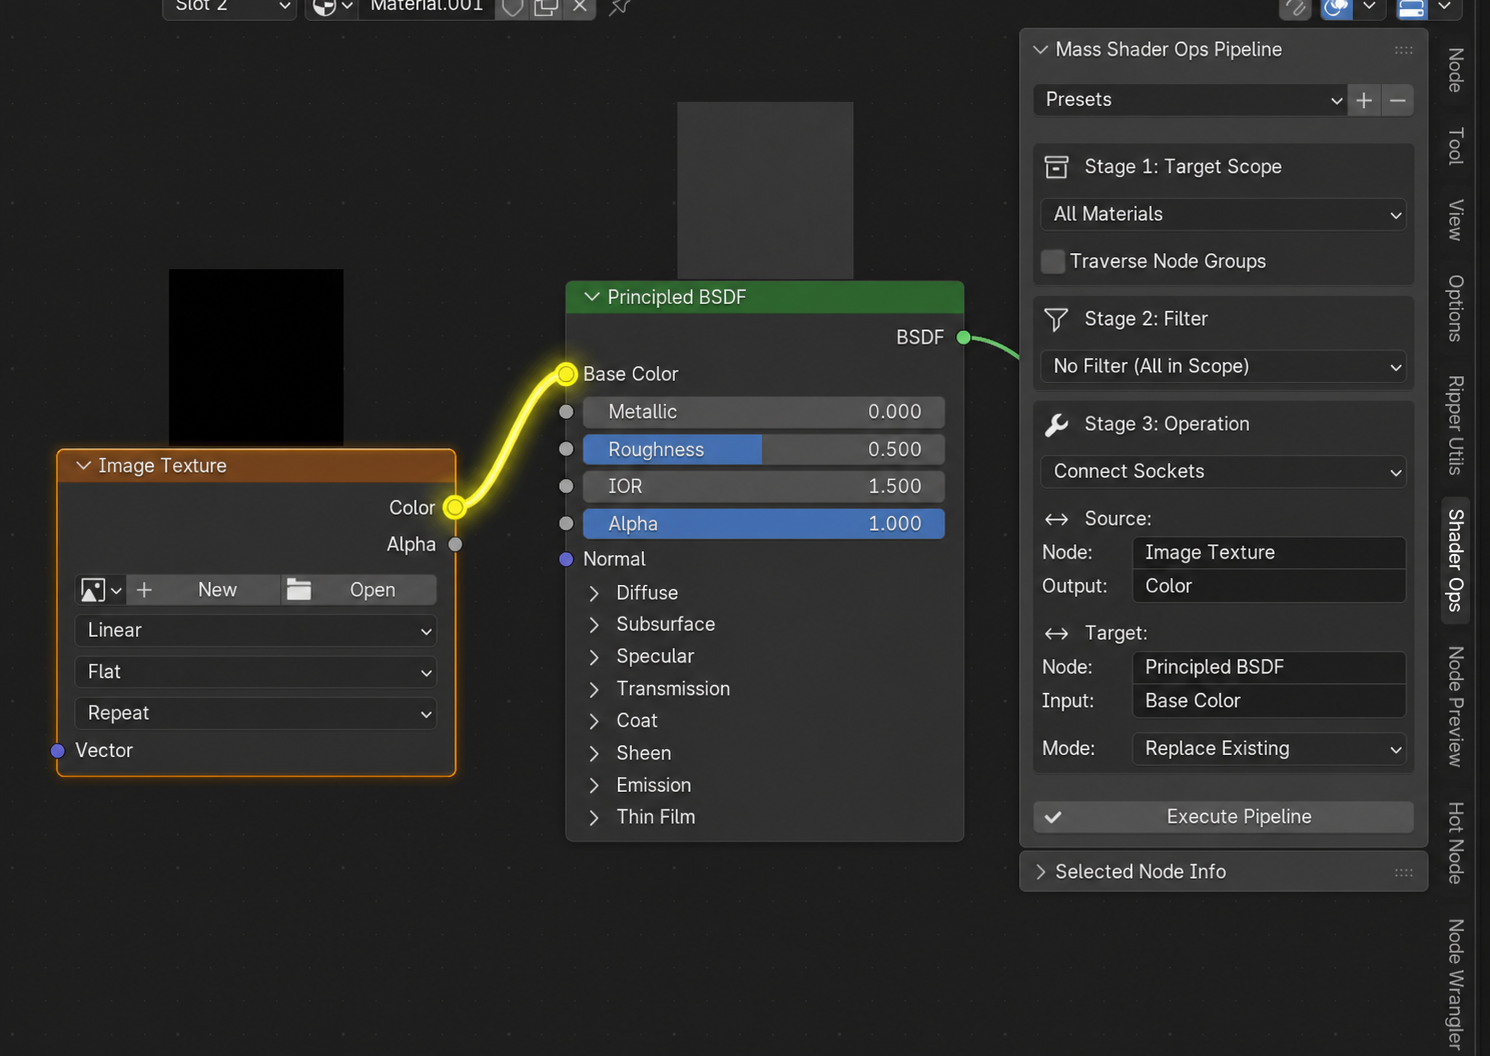
Automatically link a specific output socket to an input socket across every material in your scene. Uses a smart fuzzy matching system that handles Blender's auto-renamed nodes (e.g., Image Texture.001).
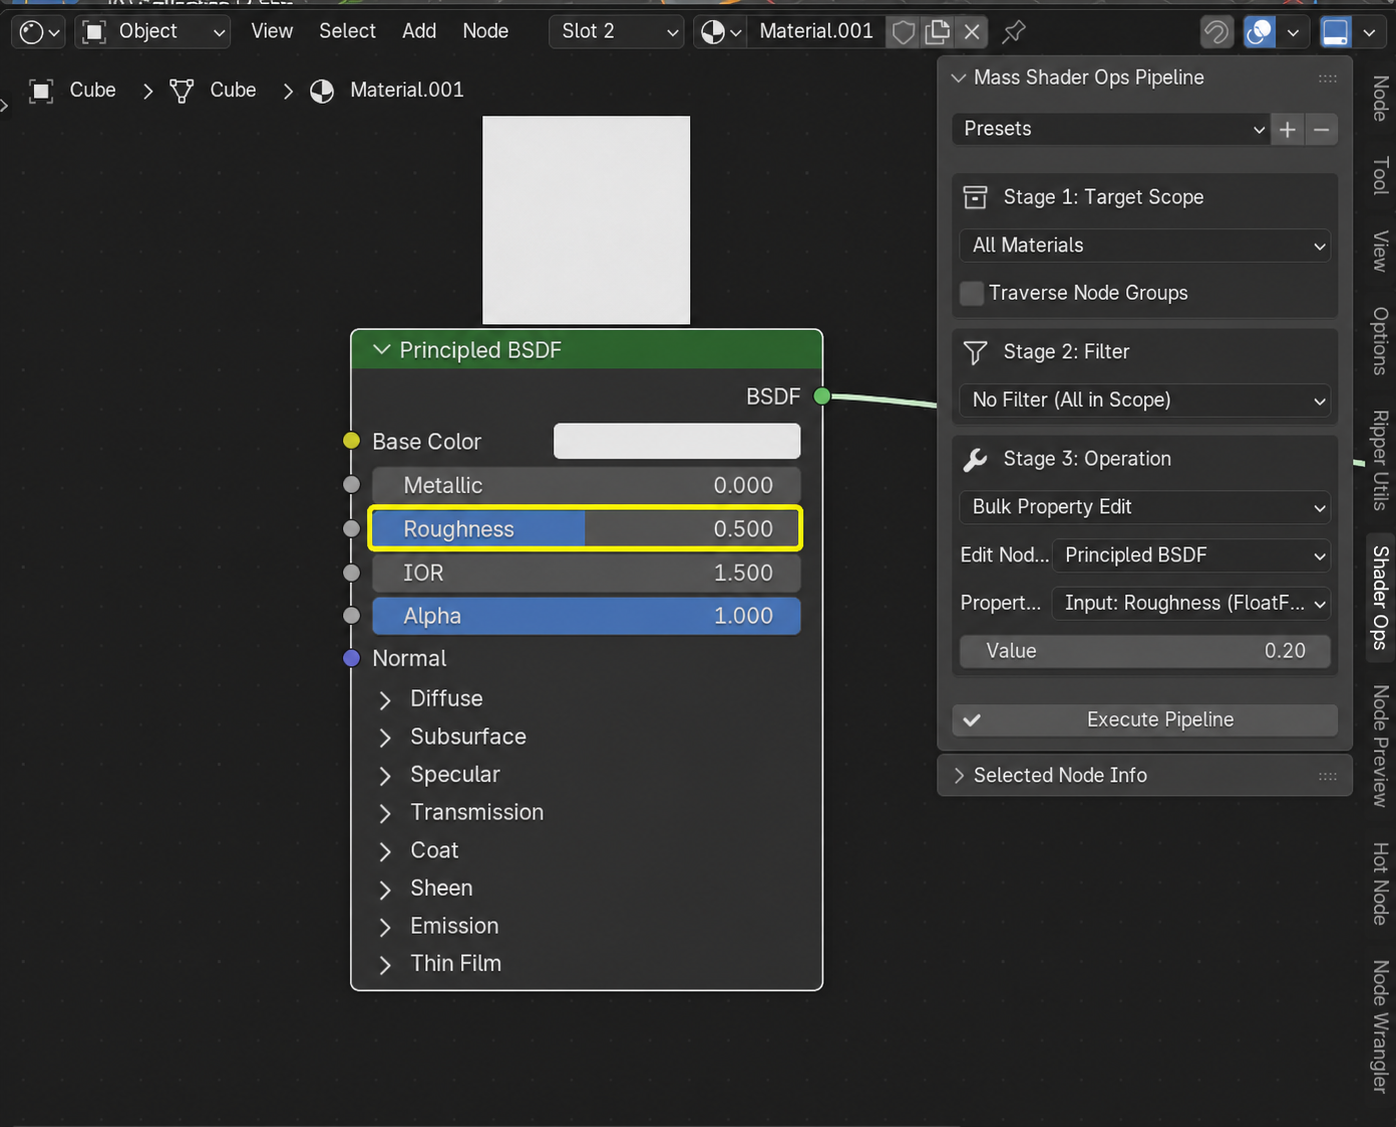
Change Roughness, Metallic, Emission, or any other node input/attribute simultaneously on every matching node. Supports smart type alignment — scalars auto-fill vectors, and vectors auto-slice to fit.
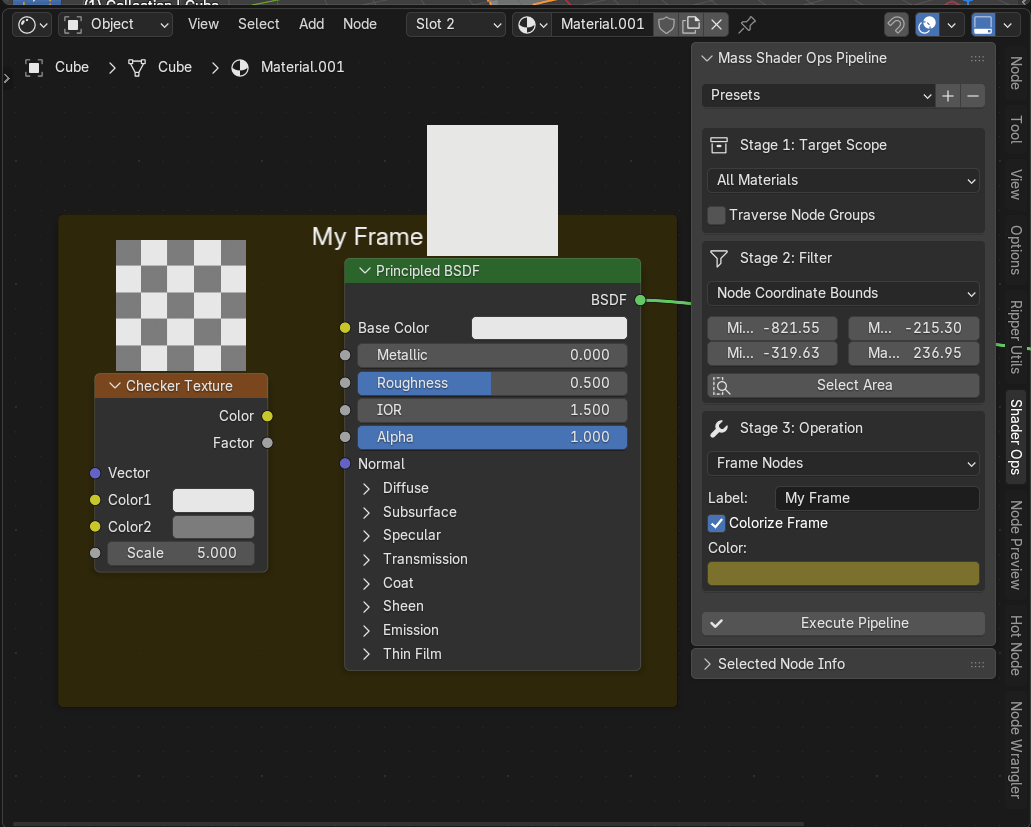
Wrap matched nodes in a named NodeFrame with a custom background color. Ideal for grouping texture nodes, math nodes, or any set of related nodes into visually distinct blocks.
Find and delete orphaned or unconnected nodes, tidying up messy node trees in seconds. Choose between orphaned only (zero connections) or aggressive mode (no outgoing links). Output nodes are always protected.

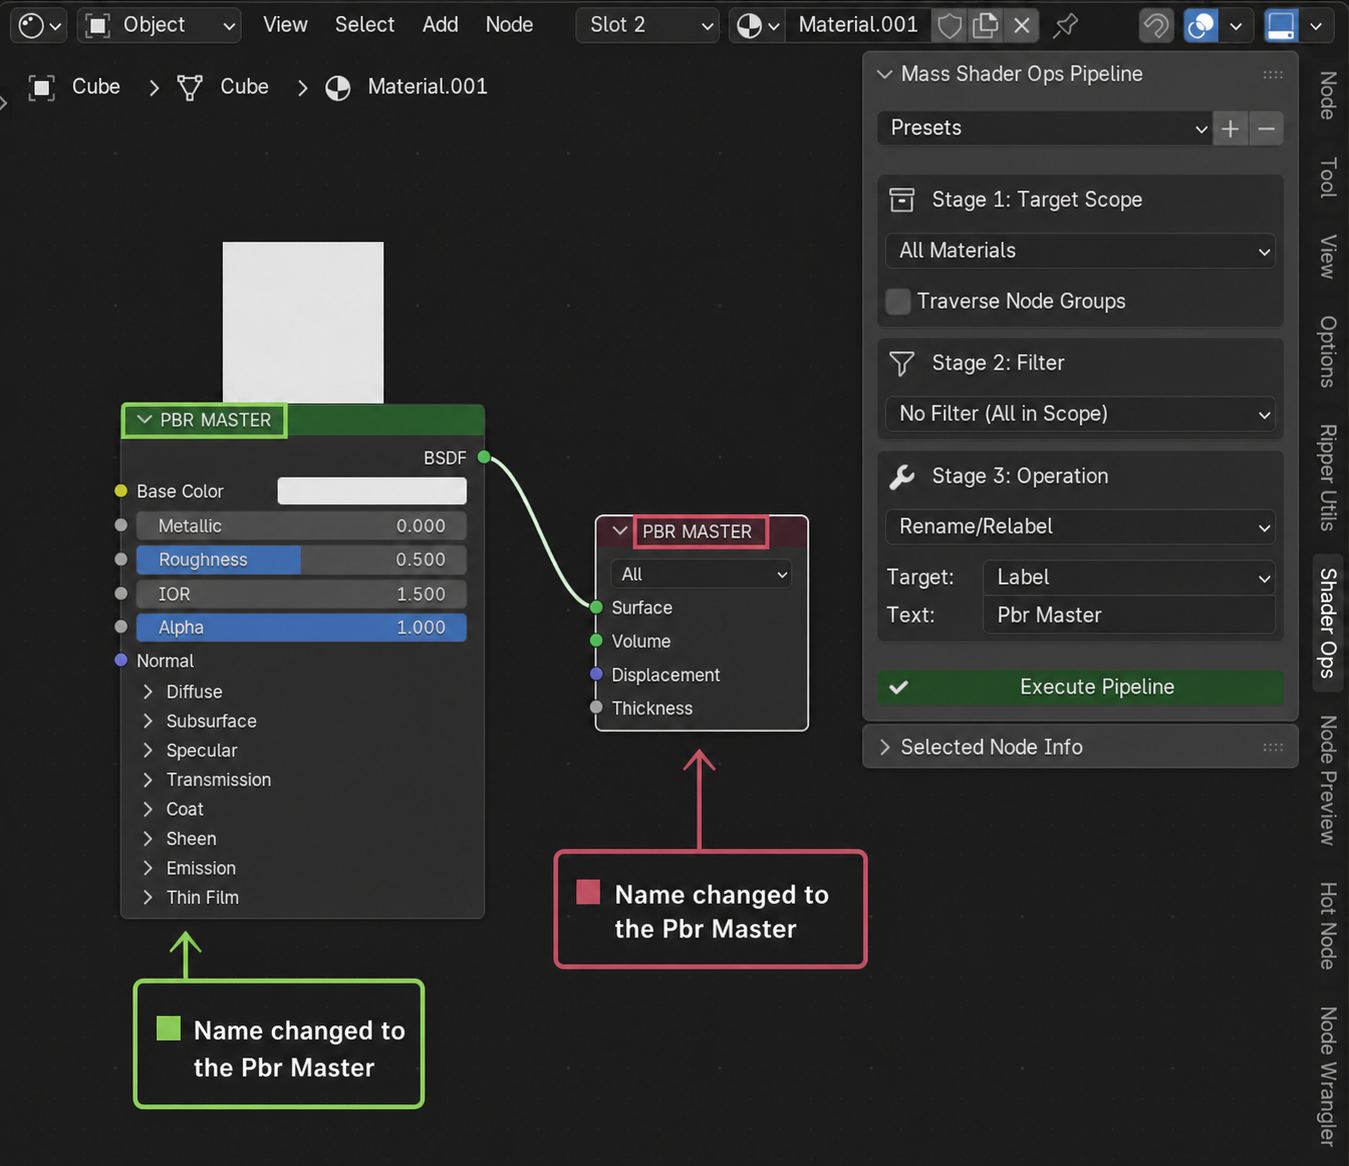
Rename the name or label of all targeted nodes to enforce naming conventions. Works with any filter — rename by type, by location, or across your entire scene.
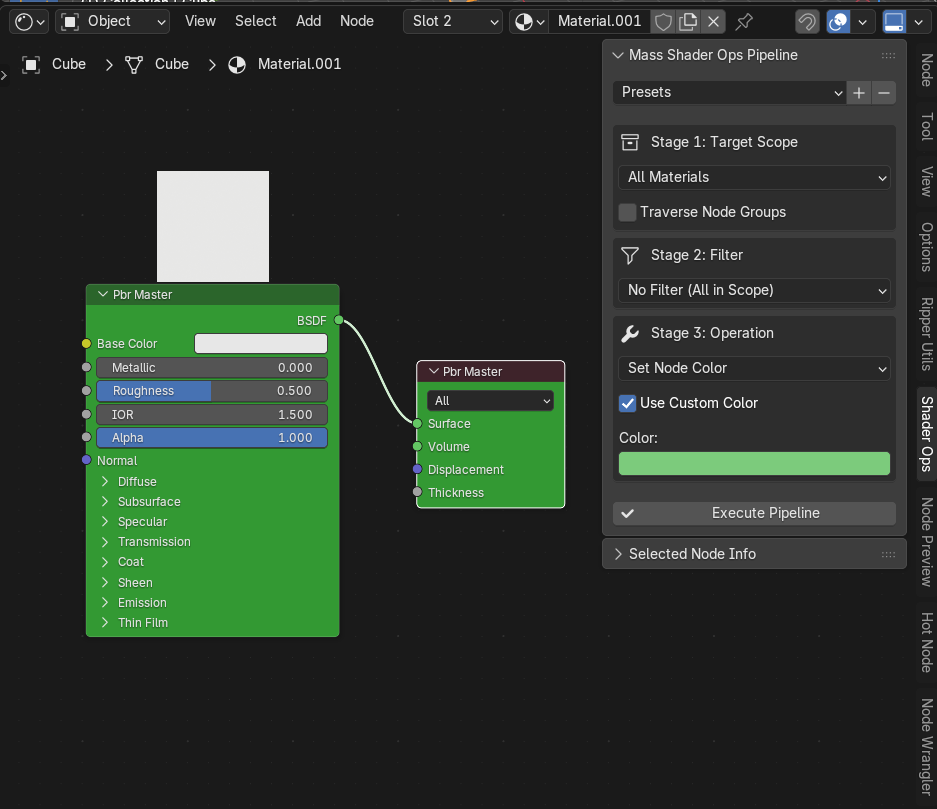
Apply a custom background color to targeted nodes so you can visually identify them at a glance. Toggle Use Custom Color on or off — turning it off resets nodes to Blender's default theme colors.
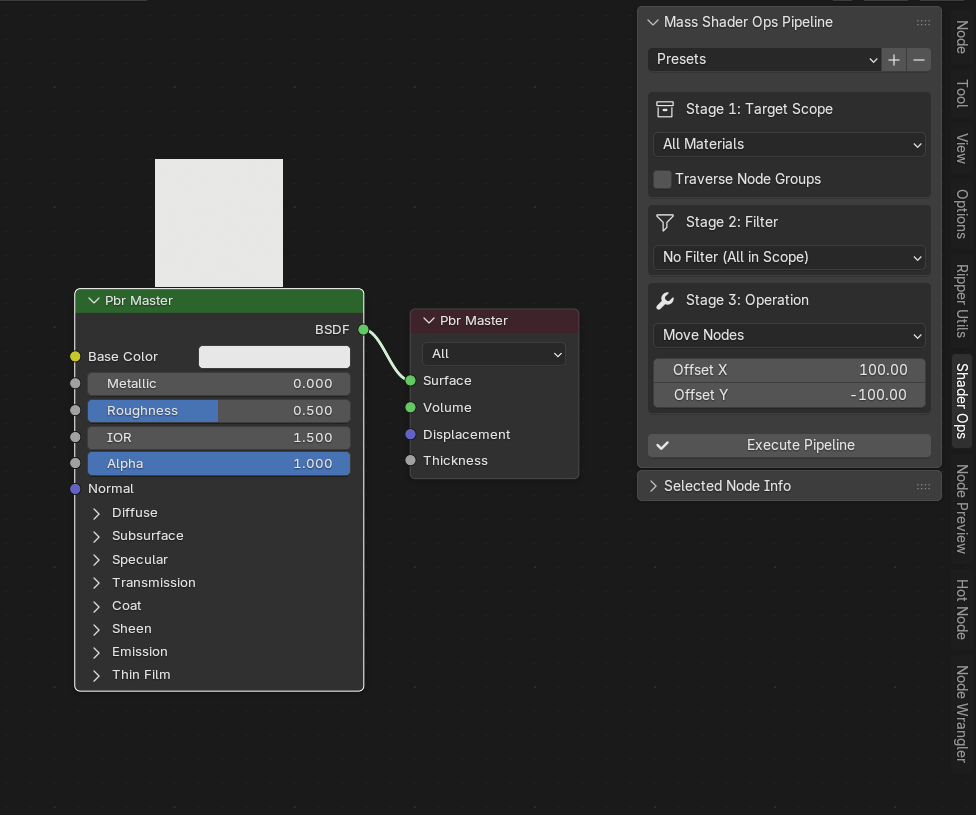
Offset node positions by exact X/Y coordinates to fix overlapping layouts, or duplicate matched nodes with an offset. All RNA properties and socket defaults are copied to duplicates.
Select matching nodes (or objects with matching materials) in the viewport for inspection, or delete them outright. At the material level, entire materials are removed; at the node level, individual nodes are removed.

Download or pack the addon source folder into a .zip archive (e.g., automatic_nodes.zip). Keep the folder structure intact inside the zip.
Open Blender, go to Edit > Preferences > Add-ons, click Install..., select the zip file, and click "Install Add-on".
Check the box next to Node: Shader Ops to activate it. Then open the Shader Editor, press N to open the sidebar, and click the "Shader Ops" tab.
Follow these steps to color-code every Principled BSDF node in your scene green — in under 60 seconds.
Any file will work — the more materials, the more impressive the result.
Switch an editor area to the Shader Editor, then press N to open the sidebar. Click the "Shader Ops" tab.
In Stage 1: Target Scope, select All Materials from the dropdown. This tells the addon to scan every material in the file.
In Stage 2: Filter, select Node Type, then pick Principled BSDF from the type dropdown. This targets only Principled BSDF nodes.
In Stage 3: Operation, select Set Node Color. Make sure Use Custom Color is checked, then click the color picker and choose a green.
Press the Execute Pipeline button at the bottom of the panel. Done!
Every Principled BSDF node across all materials is now colored green. Check any material — the effect is applied everywhere. Press Ctrl+Z to undo if needed.
The core workflow is a pipeline that flows through three stages. Configure each stage, then click Execute Pipeline to run the operation.
Determines where the addon looks — which materials to scan.
Determines which nodes or materials pass through to the operation.
Determines what action is performed on the filtered targets.
Choose which materials the addon will scan. This is the broadest filter — it determines the pool of materials before any node-level filtering happens.
Use Nodes enabled. Use this when you want to affect your whole project.Narrow down which nodes (or materials) pass through to the operation. This is where precision happens.
bl_idname). The dropdown is dynamically populated — it scans your current scope and shows only node types that actually exist. Examples: ShaderNodeBsdfPrincipled, ShaderNodeTexImage, ShaderNodeTexNoise. Node-level.
bl_idname, then use the "Copy to Clipboard" button to copy it.
Choose the action to execute on whatever passed through the filter. There are 11 operations available, each with its own set of parameters.
Offset X, Offset Y. Requires node-level filtration.Offset X, Offset Y. Requires node-level filtration.Use Custom Color checkbox (uncheck to reset to Blender defaults), Color picker.Material Output, AOV Output, Light Output, World Output) are never deleted. Parameters: Orphaned Only checkbox.
NodeFrame. Parameters:
Try the 3-step workflow without opening Blender! The mock panel on the left mimics the addon's UI. Configure a Scope, Filter, and Operation, then click Execute Workflow to see the result visualized on the node graph canvas.
Detailed breakdown of every operation, its parameters, and when to use it.
bpy.data.materials.remove() with do_unlink=True to fully purge the material. At node-level, it removes individual nodes from their node tree.Offset X (float, default: 100) — horizontal shift. Offset Y (float, default: -100) — vertical shift. Positive X = right, Positive Y = up.Offset X (float, default: 100), Offset Y (float, default: -100).node.use_custom_color = True and node.color = (R, G, B). Uncheck "Use Custom Color" to reset nodes back to Blender's default theme appearance.Use Custom Color (checkbox, default: on) — toggles custom coloring. Color (RGB picker, default: green 0.2, 0.6, 0.2)..001 suffixes), (3) User label match, (4) Node type (bl_idname) match. Socket names are matched case-insensitively.Source Node (text, default: "Image Texture") — the node providing the outputSource Output (text, default: "Color") — output socket nameTarget Node (text, default: "Principled BSDF") — the node receiving the inputTarget Input (text, default: "Base Color") — input socket nameMode — Replace Existing (removes old links first) or Append (skips if already connected)Material Output, AOV Output, Light Output, World Output) are always protected and never deleted.Orphaned Only (checkbox, default: on).
mute, label, hide, plus all input and output sockets. Uses safe socket type alignment: scalars auto-fill vectors, vectors are sliced/padded, and type mismatches are handled gracefully.Node Type — dynamically populated dropdown of node types in your scopeProperty — dynamically populated dropdown of attributes and socketsValue — auto-detects the correct input type: Float field, Int field, Bool checkbox, String text, or RGBA Color pickername (internal unique identifier) or label (visible display text) of all matched nodes to a new value.Target — "Label" (display label) or "Name" (internal name). Text (string, default: "New Node").NodeFrame layout block and parents all matched nodes to it. Sets the frame's label and optionally assigns a custom background color.Label (string, default: "My Frame") — frame header text. Colorize Frame (checkbox, default: on) — enable custom color. Color (RGB picker, default: 0.2, 0.2, 0.2).Technical details about how the addon works internally.
Blender's node trees frequently generate duplicate names (e.g., Image Texture.001, Image Texture.002). The addon uses a robust four-step fuzzy matching cascade to reliably find the right node: Exact Name → Base Name/Prefix → Custom User Label → Node Class Identifier (bl_idname). This means you can type "Image Texture" and it will match Image Texture.003 in materials where the base name has been auto-incremented.
When executing bulk edits (e.g., Roughness, color maps), the core engine handles shape mismatches gracefully. Scalar values are automatically distributed to fill RGB/RGBA vectors (e.g., 0.5 becomes (0.5, 0.5, 0.5, 1.0)), while vectors are sliced or padded to prevent data-type errors. This prevents crashes and ensures predictable behavior across different socket types.
Many production materials use reusable Node Groups (ShaderNodeGroup) to encapsulate common setups. With Traverse Node Groups checked, the addon employs a recursive scanner that enters each group's internal node tree, applying filters and operations to nodes inside nested groups — no matter how deep the nesting goes.
Save and load complete pipeline configurations as named presets. Each preset stores the full state of all three stages — scope, filter, and operation — including all parameters. Built-in presets provide common workflows (color coding, auto-connecting, cleanup), and you can create unlimited custom presets for your team's specific needs. Presets persist across Blender sessions via addon preferences.
Yes. Every operation registers with Blender's undo system. Press Ctrl+Z immediately after execution to revert all changes. Even batch operations that affect hundreds of materials are undone in a single step.
Yes — check the "Traverse Node Groups" option in Stage 1. This makes the addon recursively enter every ShaderNodeGroup to find and modify nodes inside them. Without it, only top-level nodes are affected.
The addon modifies only what you tell it to. Use the Select Targets operation first to preview exactly which nodes or materials will be affected before running any destructive operation. And remember — Ctrl+Z is always there.
Blender 4.2.0 or newer. The addon uses the modern extension manifest format (blender_manifest.toml) introduced in Blender 4.2.
It uses a 4-step fuzzy matching cascade: (1) Exact name match, (2) Base name/prefix match (handles .001 suffixes), (3) User label match, (4) Node type (bl_idname) match. This means typing "Principled BSDF" will find Principled BSDF.001, a node labeled "Principled BSDF", or any ShaderNodeBsdfPrincipled.
The addon is designed for material node trees (materials with Use Nodes enabled). World and Light node trees are not currently scanned by the scope system.
It's a material-level filter. It counts how many nodes exist in each material's node tree, then passes or rejects the entire material based on whether the count meets the threshold condition (greater than, less than, or equal to). It does not filter individual nodes.